Information about ski & snowboard gear, alpine skiing, freeride and freestyle
Alpine skiing gear
- Les skis :
Le choix d’un ski de piste s’effectue principalement en fonction de votre niveau de pratique. Vous souhaitez élargir votre terrain de jeu et avoir des skis plus polyvalents pour vous aventurer hors des pistes ? Il existe des skis All Moutain et des skis dédiés au freeride.
– Les différents éléments d’un ski et à leur influence sur son comportement :
The waist is situated amid the ski, where the bindings lay. Its width goes from 68 mm for the racing skis to 80 mm for the most accessible alpine skis.
The tip,in front ofthe ski, is softer on the accessible skis. It often has a soft rocker (progressive tip) for more versatility on powder.
The tail,cut and stiff on the racing skis for an agressive edging, it's softer for the skis for beginners in order to facilitate the turns
The ski coating is the situated under the skiWhen the range is higher, you can find more performant, quality and lasting ski-coating.
– Le comportement d’un ski est influencé par ses caractéristiques :
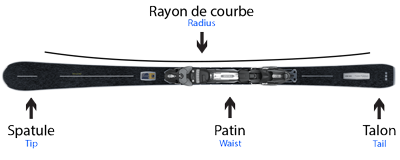
The dimension lines : it's the shape of the ski. The dimension lines are given by the width of the tip, the waist and the tail These three measurements are given in millimeters.
The size : on the slopes choose skis between -15cm and -5cm compared to your height. Short skis will be manoeuvrable and appreciated by beginners while long skis will be more stable at high speed.
The stiffness : we can distinguish the stiffness in the tip, the waist and the tail. A flexible tip absorbs shocks better than a rigid tip, which helps grip in hard snow. The stiffness of the waist will depend on your size and your technical level. The more you will use your skis, the more you will have to choose a rigid ski. Finally, the rigidity at the tail will condition the behavior of the ski when exiting a curve: catchy (rigid) or tolerant (flexible).
The ray : the ray is the natural turn of a ski. A short ray (between 12 and 15m) facilitates small turns, while a long ray (18 to 22m) is better if you ski in large curves.
The camber : it's the curvature of the ski, visible through the space between the sole and the snow in the middle of the ski when you put it on the ground. A marked camber is generally synonymous with nervous skiing.
The weight : if the weight of an alpine ski is less than a ski touring, a light pair of skis will be more maneuverable at low speed and easier to carry.
– choisir un ski adapté à son niveau :
The skis of accessible ranges are intended for beginners who want to enjoy snow and mountains, without looking for the perfect turn.
They are wide to facilitate the stability (about 75-80mm for the waist) and soft. A round tail will facilitate the turns en sortie de virage. Un skieur débutant les choisira courts (-15cm par rapport à sa taille) pour tourner facilement.
Les skis de piste performance :
Vous pourrez aller vite et avoir des prises de carres franches Orientez-vous vers des skis de la gamme performance. Ils vous accompagneront de manière plus ou moins sportive selon vos objectifs et votre niveau technique.
Les skis de compétition :
Reserved for the elite of skiers, competition skis are rarely available for sale in stores. Each ski corresponds to a discipline of alpine skiing: slalom, giant, super-g and downhill.
These skis are mostly narrow to facilitate the edge and thehook in curve. The transition from edge to edge is also facilitated to quickly link turns.
With these stiff skis , you will be able to stay on the edges even in the steep and icy parts of the most difficult tracks. Choose an adapted ray to your technique with small turns or big curves
Very narrow and extremely stiff their sidecuts and size are established for the purpose of racing performance.
They are without compromise and mastering them from top to bottom of a slope will be a challenge for many skiers!
Snowbord bindings sont en général vendues en pack avec les skis pour les gammes piste. Elles sont alors montées sur un rail. voir rubrique plus bas.
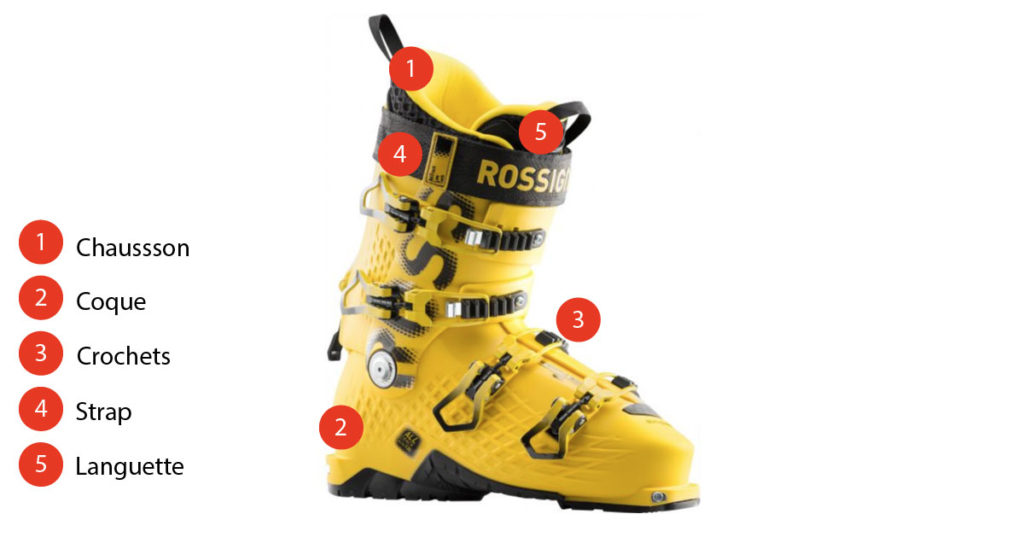
- Les Chaussures :
C’est un élément essentiel, à ne surtout pas négliger. Le choix de votre paire de chaussures de ski est déterminant pour skier sur les pistes comme dans la poudreuse sans vous soucier de vos pieds. Nous allons donc développer plus amplement cette rubrique. Interface essentielle avec vos skis, vos chaussures doivent vous apporter comfort, et maintien du pied.
Finding the right model means making wise choices among various parameters such as size, flex, shell and collar shape as well as options such as walking position.
Ski boots for men and women have an ergonomics adapted to the various morphologies, especially in the calf which is inserted lower in women. women have a collar (high part of the boot) lower, more flared and with a cutout at the back to conform to the shape of the calf. The blood circulation and venous return being more sensitive in women, the slippers are generally warmer.
Le flex
Another important data when choosing a ski boot: the flex. It'sthe index of the stifness of the boot, between 60 and 150. The choice of the flex of a ski boot is linked to the level of the skier and his morphology. The higher its level, the more rigidity it will need to transmit its pressure to the skis. For the same ski level, a strong build will also need a higher flex.
- For beginners : flex compris entre 60 et 90 chez les hommes, entre 60 et 70 chez les femmes
- Intermediate skier : flex entre 90 et 110 chez les hommes, 70 à 90 chez les femmes
- Expert skier : flex de 110 et plus chez les hommes, 90 et plus chez les femmes
- Les chaussures les plus rigides sont réservées aux compétiteurs de haut niveau et ont un flex de 140 à 150.
ATTENTION, the flex index is not standardized. So there are stiffness differences between brands with equal flex.
You can adjust the stiffness of your shoe by adjusting the tightening of the collar: loosen the top hooks a little if you want to gain flexibility.
Choosing the right size
– Lenght
The size of a ski boot is given in "mondopoint" and corresponds exactly to the lenght in centimeters of your foot . Contrary to a city shoe, a ski boot is chosen for the exact size of the foot of the skier. It is estimated that 75% of skiers choose one or two sizes too big!
How to measure the size of your feet and deduce your size in mondopoint? It's very simple :
- place a sheet of paper against a wall
- place your foot on this sheet with the heel against the wall
- do a slight flexion and mark the front of your foot with a pencil
- repeat the operation with your second foot
- measure the longest length shown on the sheet: this is your size in mondopoint
Ski boots are generally available in half sizes. If your foot size is between two sizes, anticipate the packing of the liner by choosing the half-size below.
– Width
The width of a ski boot is given LAST (width of the foot measured at the 5th metatarsus) which corresponds to the larger part of the foot. It can be easily measured by plotting the outline of the foot on a sheet of paper.
The width of the boot is chosen according to the skier's need for precision:
- 92 mm : very narrow. Reserved for competitors.
- 96 – 98 mm : narrow. For thin feet or skiers looking for precision at the expense of comfort.
- 100 mm : medium width suitable for most skiers.
- 102 mm : for wide foot.
- 104 mm : for very wide foot.
Choosing a shoe the same width as your foot allows you to combine comfort and ski control. If you want to focus on precision, choose a narrow shoe. In a shoe that is too wide, your foot will not be supported which will make the control of your skis uncertain.
- Ski poles :
Pour le choix de la taille, en tenant le bâton à l’envers, la main sous la rondelle, on doit avoir le coude à 90°. En ski hors-piste et en freeride, on peut prendre une taille de bâtons un peu plus longue car ils s’enfoncent plus dans la neige profonde. Il en existe pour tous les budgets, du plus basique ou plus technique.
The right size and adapted to your practice, they are a great help for move and balance whether on slopes or in powder snow. There are also height adjustable poles, they will be more versatile but heavier.In addition to size and color, there are several things to consider when choosing your pair of ski poles:
- The size of the washers : un petit diamètre est suffisant en piste et de grosses rondelles permettent de moins s’enfoncer dans la neige en hors-piste. Des rondelles intermédiaires sont passe-partout.
- The handles : Des designs de poignée plus ergonomiques permettent une meilleure prise en main sur les modèles hauts de gamme. À noter que les poignées sont généralement de plus petit diamètre sur les modèles de bâtons femme et enfant.
- The straps : essentielles pour une bonne prise en main, les dragonnes sont plus ou moins ergonomique et parfois accompagnées d’un système détachable pour faciliter leur utilisation. Sur certains modèles de bâtons, les dragonnes se détachent automatiquement en cas de chute pour plus de sécurité. En hors-piste, il est cependant conseillé d’enlever vos dragonnes pour pouvoir vous débarrasser des bâtons en cas d’accident.
- The tube : souvent en aluminium et parfois en fibre composite ou en carbone sur les bâtons hauts de gamme, il est de plus gros diamètre lorsqu’on cherche plus de solidité comme en freeride. Les bâtons courbés sont réservés aux compétiteurs des disciplines de vitesse.
- Protections aussi appelées « pole guards » protègent les mains des slalomeurs contre les impacts avec les piquets.
- Snowbord bindings
Les skis peuvent être vendus nus, sans fixation, ou avec une plaque déjà fixée au ski et dans laquelle il suffit de faire glisser la fixation proposée par le fabricant.
Les skis de piste et all-mountain sont généralement équipés d’une plaque et vendus en pack avec une fixation.
You have a leisure practice on slopes You need tolerance and comfort, with soft bindings and and easy to put on,made of plastic
You ski on a slope in a committed way with sharp curves at high speed, you will need a precise binding and powerful, which procures a good grip under your feet. For this, it will integrate metal parts in steel or aluminum. These bindings will be solid and will withstand the constant forces you will exert on it. Your ski boot will be tilted slightly forward and high on the snow to facilitate edging.
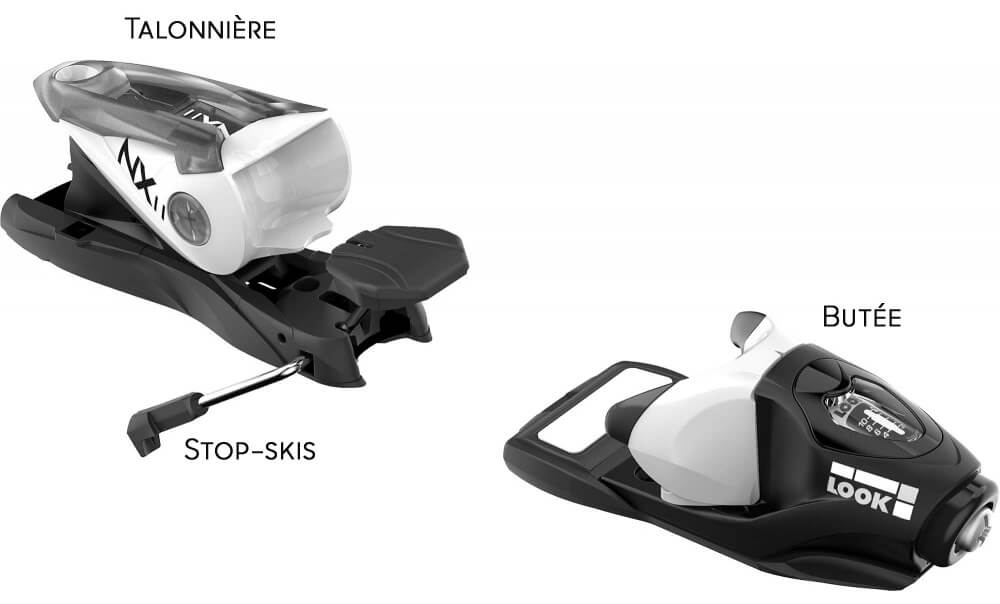
The essential safety element on a ski binding is the release or more precisely the release threshold of the latter. It is this trigger in the event of a fall that prevents a large number of injuries, especially to the knees.
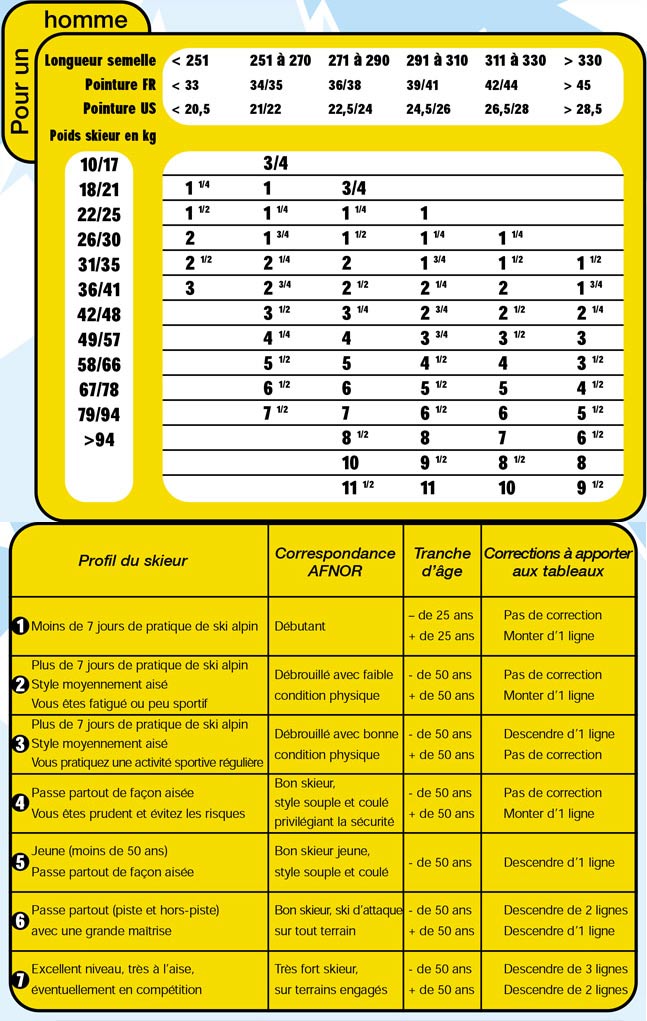
The key is to choose a binding that is suitable for your level and your weight. In order to adapt this triggering threshold to each skier, there is a standard setting to be performed on the heel piece and on the toe piece. This is called the DIN setting generally between 1 and 13. To find out your DIN, there are tables or smartphone applications. These tools allow définir le réglage de vos fixations selon 5 critères your weight, your age, your size, your level and the lenght of the sole of your ski boots.
The helmet :
Compulsory for freestyle and freeride, recommended for other levels.
The dorsal :
Recommended for freestyle and freeride.
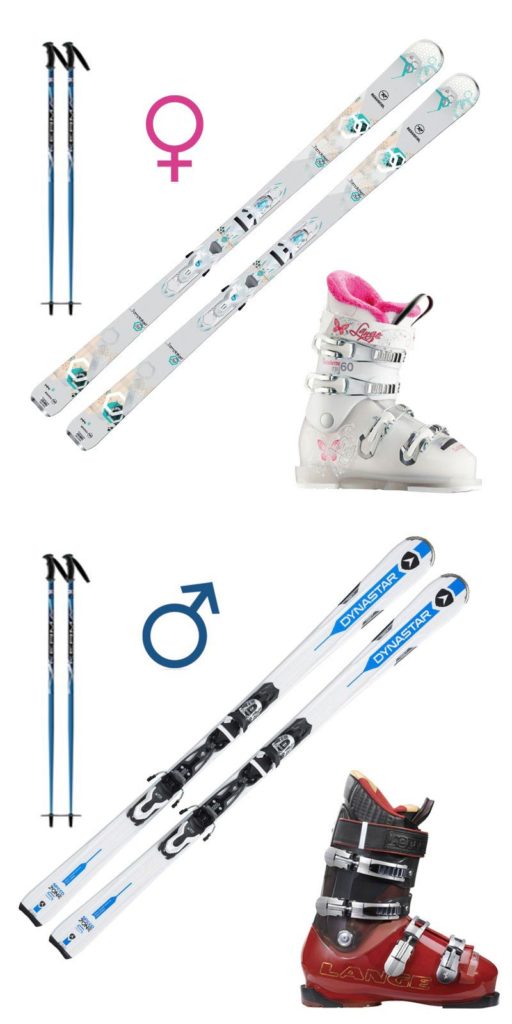
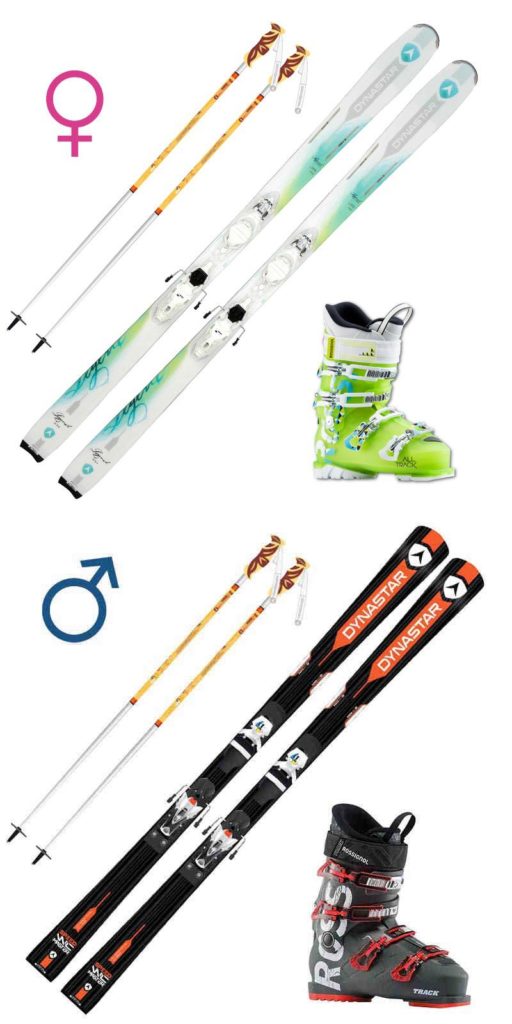
Exemples de packs selon le niveau et le sexe :
Skieurs débutants
Skieurs intermédiaires

Skieurs experts
Snowboard gear
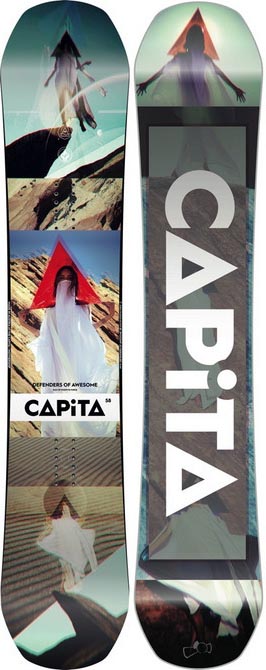
Le snowboard :
Afin de rendre les choses un peu plus simples, nous classerons les planches selon trois niveaux. Débutant-Intermédiaire, Intermédiaire-Confirmé and Confirmé-Expert. Vous allez sûrement vous poser la question suivante : “Si j’ai un niveau intermédiaire, je suis dans la première ou dans la seconde catégorie ?” Une planche de snowboard n’est pas spécifique à un seul niveau. Une planche doit être évolutive, elle doit vous permettre de progresser et de passer au niveau supérieur. C’est pourquoi nous classons les planches sur deux niveaux.
Débutant – Intermédiaire
Intermédiaire – Confirmé
Confirmé – Expert
Attention : we often don't want to be a “beginner”. Try to make an objective judgment of your level. Choosing a well suited board will not only make the experience better, but allows you to progress faster. In addition, it is not uncommon to see experienced riders using beginner boards, they are very playful and perfect for fun. However, a confirmed board will be less tolerant and could slow down your progress or even worse, make you disgusted with snowboarding!
Quel sera mon terrain de snowboard privilégié ?
– les planches freeride
– les planches 100% poudreuse
– les planches freestyle
Versatile Snowboard or All-mountain
Freeride Snowboard
Snowboard 100% Powder
Freestyle and Park snowboard
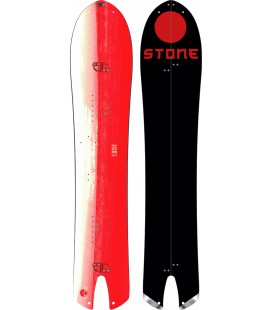
Splitboard
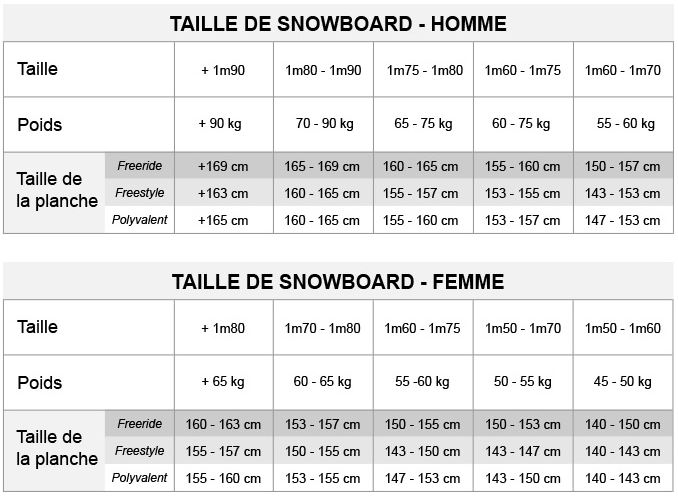
Quelle taille choisir pour mon snowboard ?
Quelle largeur pour ma planche de snow ?
Understand the cambers
Camber gives the snowboard specific characteristics of handling, grip or pop. In addition to the terrain and the level, it is a very important factor in choosing a snowboard. While each brand is constantly working to establish new profiles, we find recurring problems with all manufacturers:
Cambre Classique :
Classic camber refers to the arc formed between the nose and tail when the board is on the ground. This is what will define the properties of the board: its nerve, its pop and its grip. Disadvantages of classic camber: its uncompromising side which may quickly discourage novices and less experienced riders but will be perfect for a carving board.
Cambre Inversé :
The nose and tail have no contact with the ground. What you look for with inverted arches is better powder riding and greater tolerance for mistakes and hesitation when learning to snowboard. Boards with inverted arches are more easily oriented towards freestyle because of their playful side. They facilitate jib and flat maneuvers, but remain the partners of choice for having fun in powder. The price to pay for such versatility, a loss of stability and grip, especially at high speed.
Cambre Plat :
Flat camber forgives mistakes more easily than conventional camber while remaining more stable than reverse camber. It is flat between the legs and inverted in nose and tail to gain forgiveness, but also in lift-off and lift in powder. A good compromise for those who are not 100% sure.
W Rocker :
The W Rocker, or associated camber, is a mix between several arches, which forms an undulation of the board when viewed from the side, hence its name "W". A rocker between the feet, which becomes classic later, and becomes inverted again in nose and tail. The idea is to combine the qualities of classic camber (pop, grip, dynamism) and those of reverse camber (ease of downforce, tolerance and lift in powder). In our opinion, the associated camber corresponds to the camber that can satisfy the greatest number of riders today.
Cambre Rocker :
Cambre Rocker comes in the form of a classic camber between the feet and a rocker in the nose and tail. This allows for the best possible blend of the grip and pop qualities of classic camber while adding the playfulness and powdery lift of tip rockers.
Freeride :
A classic camber between the feet and a big rocker in the nose. This configuration gives pride of place to grip on the track and power to maintain control even at high speeds, while the rocker is there to magnify the behavior of the board in powder with easier lift-off and improved handling.
What's a rocker ?
If the snowboard was strongly inspired by the ski to draw the bases of its construction, it is the reverse that it is about when one speaks about rocker and the snowboard was the first to use it for improve cornering and powder performance. Characterized by a progressive tip rise, the rocker is now omnipresent on boards and especially freeride boards.
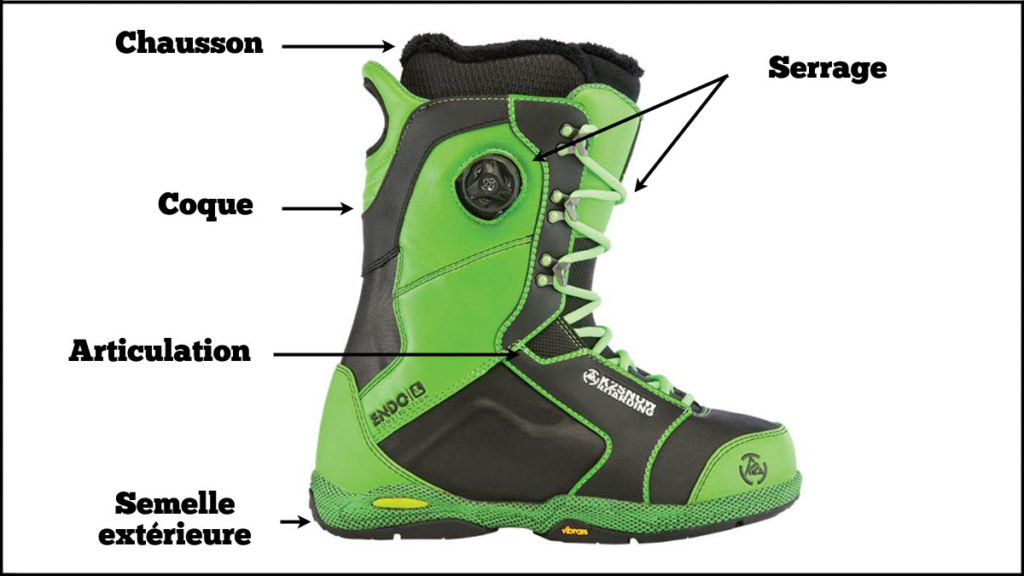
Les boots de snowboard
If they are very different from ski boots, snowboard boots share with them two important criteria: The flex and the morphology of your foot, which will determine, for many, the choice of your model.
Find your ideal flex :
– En fonction de votre niveau :
Débutant – Débrouillé : Vous êtes débutant ou en phase d’apprentissage. Vous êtes habitué des fautes de carres, ce qui ne vous empêche pas de vous amuser ni de progresser ! Rider occasionnel, vous évoluez exclusivement sur piste.
Confirmé : Rider régulier, vous évoluez en confiance et votre bonne maîtrise technique vous permet de passer un peu partout. Vous faites peu d’erreurs et restez maître de votre planche même à grande vitesse.
Expert : Technique parfaite et aisance en toutes conditions : le snowboard n’a plus de secret pour vous !
Débutant ou débrouillé, vous avez besoin de confort et d’un matériel de snow tolérant. Des boots souples vous permettront d’être à l’aise toute la journée, pour un apprentissage en douceur. Confirmé ou Expert, vous préférerez des boots that are stiff which bring you stability and optimal transmission of downforce.
– En fonction de votre type de pratique :
Who says jumps, says landings, and as many solicitations of the collar of your boots to absorb shocks, or on the contrary to obtain the necessary impetus before you take off. So in park or freestyle, we prefer soft flex snow boots, notamment sur le haut du collier, pour épargner les tibias et bien profiter du pop de la planche. Les riders All Mountain, quand à eux, trouveront satisfaction dans des boots de snowboard au flex medium permettant une progression sur piste comme en neige fraîche.
Although they do not require the same technique, Freeride and Carving will instead use boots with medium or even hard flex, to ensure good support and optimize the transmission of downforce.
Respect the morphology of your feet :
Good snow boots are first and foremost boots that you feel good in. There are as many foot shapes as there are riders, so trying on is a must before deciding whether a snow boot is right for you or not. Opt for thermoformable slippers, which will bring you maximum comfort by perfectly matching the morphology of your foot. The size should be chosen slightly above your usual shoe size, especially to accept thick socks, but you should keep a feeling of support. Note that the foam of the liner settles over time: be careful not to take too big or you will end up swimming in your boots!
The 5 lacing systems:
– le système BOA
Composed of thin steel cables and a small wheel, the BOA system allows a quick tightening of the shoe: put your foot on, turn the knob until you feel the support you need, and you're ready to go. Appeared in 1996, this system was first fitted to snowboarding, then golf and cycling boots ... and is now even found on some running shoes.
– Le système Focus BOA
Adapted from the previous version, it is a double BOA device that allows even more precise tightening on the top but also on the bottom of the boots.
– Le laçage hybride :
BOA System and traditional lacing to very precisely adjust the tightening.
– Le système Speed Zone :
A small handle placed on the outside of the snowboard boots allows quick tightening in one movement: pull the handle to tighten the laces. As with the Focus Boa system, the Speed Zone tightening can affect two different parts of the shoe.
– Le système Traditionnel :
The "old-fashioned" lacing, which has its share of drawbacks, in particular the need sometimes to remove the gloves, but which remains a system allowing excellent precision in the tightening of your boots. Traditional lacing, through its manual action, takes into account all the specifics of your foot: you can leave one area looser than another, which further increases your comfort.
More information :
Contrary to what has long been the black point of ski boots, snowboard boots do not hinder walking, and their basketball look is nothing to lie about: comfort and flexibility are there, to facilitate in particular progress on the flat. Some models offer removable slippers, very practical for drying and maintaining your snow boots.
Advice :
Try on your boots with special technical ski / snowboard socks, you will avoid unpleasant surprises when you get on your board. When trying on, stand in a standing position: your big toe should brush against the front of the shoe. Then, position yourself in forward bending (gliding position), check that your foot moves back slightly at the same time as your shins press on the collar. Always keep a feeling of good support: a heel that seems very mobile to you most likely means that the boots are too big.
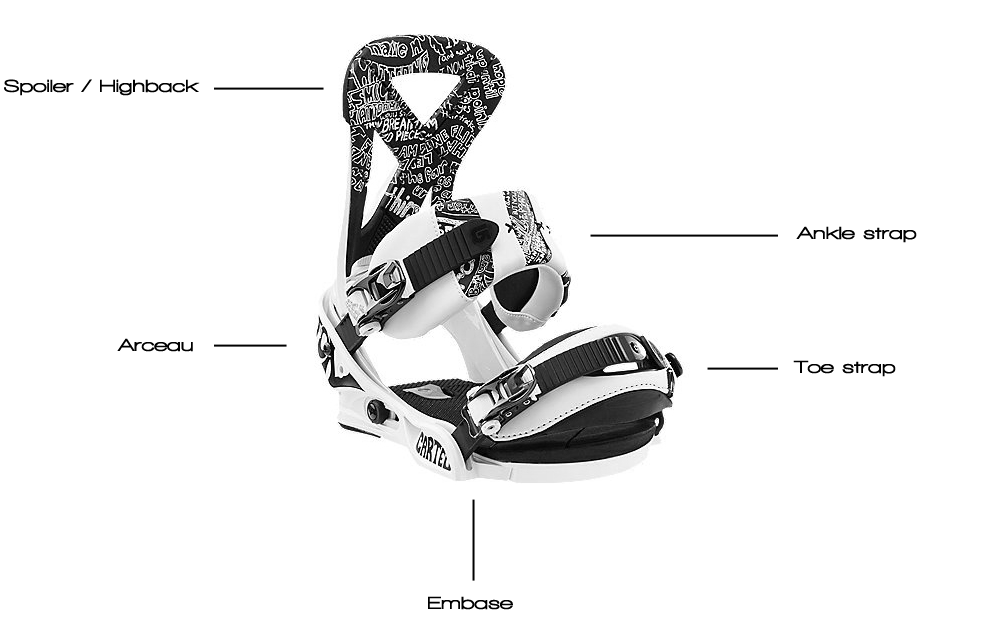
Les fixations de snowboard :
On distingue deux grandes familles de fixations de snowboard. Les entrées arrière, et les classiques. Il n’y a pas de mieux ou de moins bien, c’est en fonction des préférences de chacun. L’entrée arrière est très pratique et vous permet de chausser aussi vite que les skieurs. La marque Flow fût pionnière en la matière. La classique permettra un ajustement un peu plus personnalisé.
We often tend to downplay the importance of a snowboard binding. Yet she is the only link between the board and the rider. It's kind of the steering wheel of the car, it's the car that lets you steer the snowboard and stop if needed. So don't neglect it! If they are very similar to each other, they all have marked differences. A good binding should bring you three essential things : comfort,some precisionand must be functional. The more you go upmarket, the more the binding will use high-performance, comfortable, strong and light materials. From the thickness of the strap to the responsive carbon frame, set your priorities. Your style will influence your choice of course. Freestylers will look for a flexible and comfortable fix when freeriders orient themselves on stiff and responsive material. While comfort and performance generally go hand in hand with a budget, functionality does not. By functionality we mean the ease of use, the straps, and especially the fitting system, classic or rear. Once your selection is made, all you have to do is adjust them to your snowboard.
I) Comment régler ses fixations de snowboard ?
A la différence du ski, les fixations de snow sont sans déclenchement : vos pieds ne déchausseront pas en cas de problème. Pour éviter des blessures importantes notamment aux genoux, il faut les régler minutieusement et ce réglage se fait en plusieurs étapes :
1) Connaître son pied d’appel : Goofy ou Regular ?
If you have never snowboarded, a very simple little test can help you determine which foot should be in the front to evolve as naturally as possible: ask someone to push you (slightly!) In the back: the foot that you will step forward first to keep your balance is your takeoff foot. You will be “Goofy” if your right foot is forward, and “Regular” if your left foot is forward.
2) Choisir sa position en fonction de sa pratique :
There are 3 positions :
a) The position « / / »
The two feet are parallel, but oriented towards the slope. A position adopted by those who favor pure speed and alpine practice.
b) The position « | / »
The front foot is oriented 15 ° forward while the rear foot remains at 0 °. A position recommended for beginner riders or anyone who does not have a committed ride and predefined terrain.
c) The position « \ / »
Duckstance or “canard” position in French. Recommended for novices to promote learning and appreciated by freestylers, it offers a better position for rotations, jumps and fakie.
3) Les réglages :
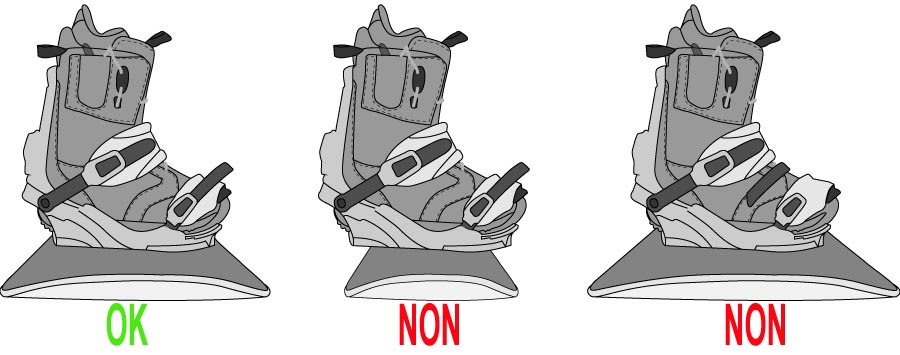
a) The stance (distance between bindings)
This is an essential parameter to improve the control of the board. To calculate the stance, you need to:
- your height (cm) x 0.32 = X for a man (+/- 2 cm)
- your height (cm) x 0.3 = X for a woman (+/- 2 cm)
If the board is your size, more often than not the ideal stance will simply be the central position of the inserts. But this setting is of course at your convenience.
b) The angle of the bindings
The angle of the rear foot is always smaller than that of the front foot (about half). The stronger the angle, the sharper and more precise the passages from edge to edge will be. However, it remains difficult to give an ideal standard position. Each rider refines their settings over time. If you are new to snowboarding, 15 ° -21 ° at the front foot and 0 ° at the rear foot seem to be the best settings. Then come settings depending on the chosen terrain:
- Freestyle / park: front 15 ° to 18 ° / rear -9 ° to 15 ° / bindings centered on the board
- Freeride / powder: front 18 ° to 30 ° / rear 5 ° to 15 ° / bindings shifted back
- Versatility: front 15 ° to 21 ° / rear -5 ° to 5 ° / fixings centered on the inserts.
c) Position on the board
The bindings are not necessarily symmetrical in relation to the center of the board. A further rearward shift will optimize its behavior in powder with easier lift-off, while more centered bindings will favor freestyle maneuvers. To choose the fix retraction:
- 0 to 1 cm behind in freestyle
- 1 to 4 cm behind in freeride
- 0 to 2 cm behind for alpine
II) Quelques conseils :
- All these adjustments which are there to improve your performances, depend on your feelings and will evolve according to your level and your program.
- Beware of extreme positions, often uncomfortable and sometimes even dangerous for your joints.